Instructions
Basic (unregistered version)
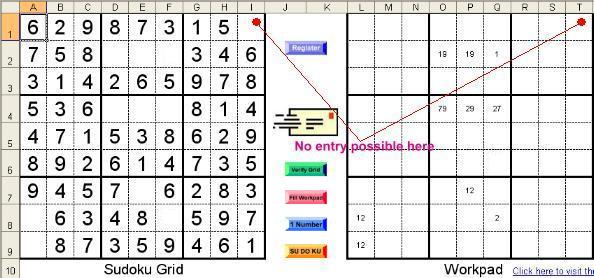
In the first sheet, named “Sudoku”, the left grid named “Sudoku Grid”
can be filled in by typing the appropriate number (1-9) in the cell.
The Right Grid, named “Workpad, can be populated, to show possible values,
by clicking on the red “Fill Workpad” button.
Numbers entered on this grid represent all possible solutions for a
specific square simply checking the contents of the Row, Column & Square of
nine which contain it.
After typing in a number you must move the cursor from the cell before
clicking any button (or nothing will happen).
Based on the entries in the “Workpad”, the “Sudoku Grid” can be filled
in manually.
For any grid, whether completed on not, you can click the green “Verify
Grid” button to check, automatically, for any conflicting entries. This only
checks for duplicate numbers in a row, column or square of 9. It does not check
that numbers are in the correct cells to give a complete solution.
The 2 “Rough Work” sheets can be used to try out various options. The
“Fill Workpad” and “Verify Grid” buttons also work in these sheets.
If you “Fill Workpad” and find that the corresponding cells in the
Sudoku Grid and the Workpad are empty (see the cells I1 and T1 in the example
below) you know that the incomplete “Sudoku Grid” is not correct. For some more tips on using the Workpad,
click here.
You can, quickly, copy the Sudoku Grid between worksheets as follows :
- Type ctrl-q to select the Sudoku grid you wish to copy
- Type ctrl-c to copy the grid to the clip board
- Select the worksheet you want to copy it to.
- Type ctrl-q to select the destination grid
- Type ctrl-v to paste the Sudoku grid.
If you are using Outlook, or any other mail client, and wish to send the
solution by email. It is important that you only select the grid you wish to
send.
To do this, select the Worksheet containing the Grid you wish to send,
then click on the email icon, ![]() .
.
The Grid will be copied to the Email worksheet and selected ready for sending
(as below).
Now just fill in the “to address”, “subject” line and “introduction”
paragraph. Then click the “Send this Selection” button at the top. Introduction
is available in Outlook 2003. In previous versions, you should fill in your
details in the 3 rows below the grid
In the Email work sheet, which are also selected (as in the example
below). If you do not have the email view, selecting “File”, “Send to”, “Mail
Recipient” should generate the view. Then Save Sudoxu.xls and this view should
appear each time Sudoxu.xls is opened.
(Note: This email formatted spreadsheet only appears if Outlook is
already running on the PC, before Sudoku.xls is opened)
(Note 2: I have tried it with Outlook Express & Excel 2000. Only the
“Send Sheet”, not “Send this Selection”, option is available. In this case you
can remove the ![]() and
and ![]() buttons from the Email Worksheet. You’ll need
to “Unprotect” the sheet from the Tools menu first, which should be no problem
as there isn’t a password on the “Email” worksheet.)
buttons from the Email Worksheet. You’ll need
to “Unprotect” the sheet from the Tools menu first, which should be no problem
as there isn’t a password on the “Email” worksheet.)

If you don’t want the email view, simply send the sheet to any email
address (your own for example) and then save it.
If you are not using the email view, you can still follow the above
procedures to send an email. However, finally, to send the mail you will have
to select, from the “File” menu, “Send to”, “Mail recipient”
Clicking on the orange “SU DO KU” button has no function in basic mode.
Click on the Blue “Register” button to register the software &
activate the advanced “SU DO KU” function. More information on registration is
available here .
You should check the Feedback & FAQ which may
also be of assistance.
You can now use Sudoku.xls to create your own Sudoku puzzles. Have you
just finished an exceptional puzzle and you would like to try another one at
the same level? Simply select the “Creator” worksheet and copy the puzzle into
the “Sample Puzzle” Grid. Press the “From Sample Puzzle” button and a new
Sudoku will appear in the “New Puzzle” grid. This puzzle will be of an
equivalent level of difficulty to the sample puzzle. Pressing the button again
will generate another puzzle of the same level.
Additionally, in Registered
copies of Sudoku.xls you can automatically generate a puzzle of the required
grade by pressing the blue, green, amber or red button.

Instructions
Advanced (Registered version)
Registering Sudoku.xls Activates the ![]() and
and ![]() buttons, enabling automatic populating of the “Sudoku
Grid”. The
buttons, enabling automatic populating of the “Sudoku
Grid”. The ![]() button offers minimal help, filling in a
single number on the uncompleted Sudoku grid. Using the
button offers minimal help, filling in a
single number on the uncompleted Sudoku grid. Using the ![]() button allows the number of iterations to be
set from 1 – 20. This will run, automatically, through the population algorithms
the selected number of times when the button is clicked. There are also 2 “hidden” values. If 20
iterations doesn’t help you, you can set the “no. of iterations” to ** (2
asterisks) or £€ (pound euro) for a little more help. These buttons are not available on the 2
Rough Work sheets.
button allows the number of iterations to be
set from 1 – 20. This will run, automatically, through the population algorithms
the selected number of times when the button is clicked. There are also 2 “hidden” values. If 20
iterations doesn’t help you, you can set the “no. of iterations” to ** (2
asterisks) or £€ (pound euro) for a little more help. These buttons are not available on the 2
Rough Work sheets.
The “Sudoku Grid” can still, also, be filled in manually, as required. A
combination of these functions and manual entry can be used to complete the
grid.
Registering Sudoku.xls also activates the coloured buttons in the
“Creator” worksheet for automatically generating Sudoku puzzles at the selected
level.
More information on these advanced functions can be found here.
Click Here to register
the advanced SU DO KU function
Workpad tips Fiendish example Advanced Function Hidden Functions Sudoku.xls Help Feedback & FAQs Sudoku
Postcards Release notes Links
Puzzles for publication